07/11/2024

If you guys have been following along on social you'll have been a part of my ceramics journey already but I felt it was important to pop something on here for anyone wondering where I've been. For many years I've worked hard to build up a community of fellow creatives on this platform and I've absolutely adored making tutorials and watching you guys recreate them! However over the last few years between raising my boys, renovating our house and juggling freelance projects I've posted less and less on here. 

After lockdown, I rediscovered my love of clay and decided to start making pieces for my home. Let's just say I became a little obsessed and that hobby spiralled.. I bought a kiln and turned my garage into a studio aha! I'm so excited to open up shop and I hope you'll follow along.


Caroline Burke Ceramics is now live, handbuilt functional art for your home. 

I hope you'll follow along on my latest adventure, if you pop over to my new site you can sign up to my newsletter on there. (I'll send the occasional update about what I've been making and what's launching next.) I'm currently working on a small batch of handbuilt mugs and some cute little Christmas decorations.

Hopefully see you soon!

Caroline x

12/04/2023


Good morning guys. I've got SO much to share from our home renovation (and life in general) but I thought I'd get you up to date with my latest DIYs before I deep dive into reno chat! 

It will come as no surprise that today's DIY is an IKEA hack. I think we can all remember a time when we owned a Billy bookcase right? well, this will be my third one and I wanted to give it a new lease of life. 


I adore reeded glass cabinets, and this is a great way to achieve the look of a high-end one at a fraction of the cost. I've used window film and a quick paint job to transform the look of a standard IKEA bookcase. 


Materials used:

Reeded glass film
BIN primer (the only one I'd recommend for painting IKEA surfaces)
Brass door handles


You can find the full reeded glass tutorial here and trust me when I say this glass film is top-notch (not like the antiquated patterned privacy film that you may have seen in the past!)

Let me know what you think..

Back soon

Caroline x


29/04/2020


ikea hack cane bookshelves for nursery

i've been making some little changes around the house whilst we're on lockdown, there are so many things i want to do but having an energetic toddler means time for home improvements is v. limited! however there is one update that i wanted to share on here, a cute modification to the shelves in gabe's room.

29/03/2020

diy house number sign with plants


Now that spring is here I've been keen to start a few outdoor projects, aside from our back garden (which seems to need an overhaul every year) one DIY idea that's been on my to-do list for a while is a house number sign. I've seen some v. cool ones and quite frankly our current house number is so damn ugly something needs to be done about it!

01/03/2020

neutral nursery with cot
so i totally intended to share our nursery photos before gabe arrived but omg honestly i have no idea what happened but i never got around to it so here we are a few years later than planned! 

26/02/2020

DIY ikea hack leather pulls

i'm obsessed with IKEA, it's no big secret that i go as often as possible and consider it a fun day out rather than a chore (unlike most people!) the beauty of their furniture is that is on-trend, practical and hugely affordable, but sometimes it's nice to personalise it so you don't have exactly the same things as everyone else right? meet these DIY leather pulls.. they're painfully easy to make and are a total upgrade on the rather basic fittings that come supplied.

IKEA HACK leather handles

you could use these handles on anything from kitchen cabinets, bedroom drawers or bedside tables to give them a whole new look with minimal effort.

pop over to read the full tutorial i've shared on hunker on making these DIY leather pulls and let me know if you try it on any of your flat pack furniture!

back soon

caroline x

23/01/2020

modern cane necklace display

so, january has felt like a reallllllly long month so far.. right?? seriously, how is it not february? anyway, i thought i'd ease into 2020 with a simple DIY for this cane jewellery stand. i'm in a 'new year, new tidier me' frame of mind so it seemed appropriate.

13/12/2019


embroidery hoop hanging planter
modern hanging planter diy


hey guys, i'm back today to share a cute and simple project.. a modern planter made from embroidery hoops. when i decided to use hoops for a DIY it was an easy choice for me to make them into a hanging planter (i'm a huge fan of filling my home with greenery but my shelves are at capacity so hanging them is an ideal solution.) plus, embroidery hoops are super versatile, from table centrepieces to wreaths or jewellery displays they're always handy to have in your craft stash.

02/12/2019


diy christmas gift toppers

i'm back again with some more christmas ideas (can you tell i'm really feeling christmas crafts this year aha?)

i recently teamed up with creative rox to create 3 simple but v. cute monochrome gift toppers with their craft supplies, all of them would make the perfect finishing touch for your christmas gifts.

modern diy gift wrap

i've made 3 quick toppers from paper, clay and yarn that will totally up your wrapping game this year.

i'm sharing the tutorial for each one over on the creative rox blog so go check them out!

diy gift topper for christmas
diy modern christmas gift toppers

back soon

caroline x


30/11/2019


modern christmas decororations

every year i have the best intentions of rounding up my favourite festive DIY projects but it never happens. this year by some miracle (and by miracle i mean the help of my mum's babysitting) i've actually managed to do it.. hurrah!

as you may have guessed i love simple DIY'S with a handmade feel so for the last few years i've focused on modern scandi-inspired makes at christmas. today i'm sharing my some of my most popular projects as i'm sure you've probably missed a few of them in the hustle and bustle of the holiday season.

28/11/2019

autumn winter wedding table ideas

Ad in partnership with Sainsburys Home

I absolutely love this time of year, dark cosy nights and the anticipation of Christmas just around the corner, yep, it gets me every time! One of my favourite things to do is set the table, whether for a casual brunch or a more formal dinner, food is always the best way to bring people together.  

Generally, I always tend to put together a simple and minimal table arrangement, in recent years I've found myself drawn to a moodier romantic vibe that I think sits well with the autumn-winter nights. I've teamed up with Sainsbury's Home for this how-to post as their kanso living range was the inspiration for this winter-themed setting.

wedding table ideas dried flowers

Pick a theme and colour palette.

The key to setting any table is to have a vision of the finished table before you start. Are you going for a contemporary table or something more rustic and earthy? Will it be colourful or monochrome? 

I wanted a serene and classic table with a muted palette of grey with touches of black and white for contrast. I'm using the Sainsbury's Home Kanso dining collection which is full of simple details from expressive textile patterns to delicate rippled tumblers.

Kanso takes its name from the Japanese word for simplicity which goes hand in hand with the vision I had for a paired back winter table. I wanted something grown-up and contemporary but with a little bit of a wow factor...

dried flower centerpiece wedding table


Add natural textures.

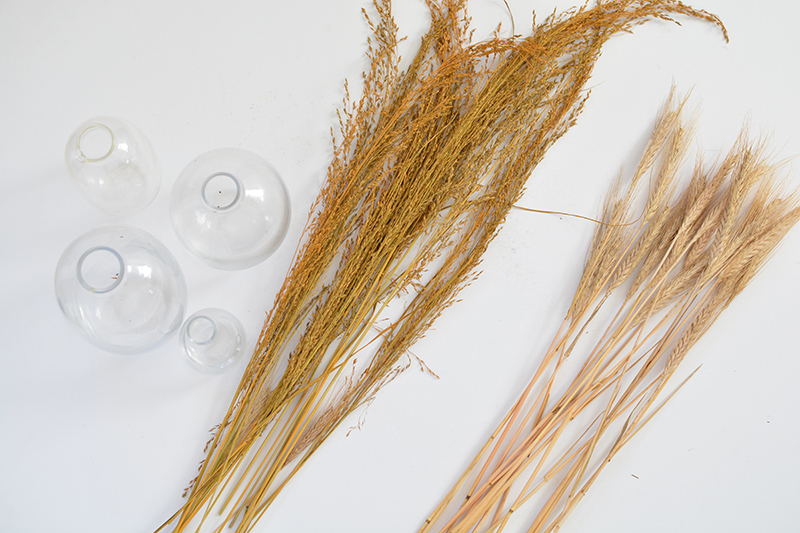
I always add some foliage to my table settings, usually, I love to add some greenery like eucalyptus or pine but this time I really wanted to use dried grasses for an A/W twist. Grasses are really on-trend this winter and they work so well against the smokey grey of the glassware. Foraged branches would also work well for a winter table.

dried flwers

To create a simple table arrangement take a collection of small glass vases and some dried flowers/grasses.

dried flower centerpiece

Use scissors to trim the grasses to varying heights and pop little clusters into each vase.

dried flowers modern tablescape

Place the vases at regular intervals along the table to add some height and drama to the table setting.

dried flower centerpiece


I also made some quick DIY linen napkins. Napkins are an easy and practical way to add some texture to a table.

diy linen napkins

Take a piece of linen and make a small cut at the width you require each napkin.

diy napkins

Using your hands (not scissors) start from the incision you made and rip the rest of the way along the linen.


Hand torn linen has a lovely rough feel that contrasts so well against a start contemporary setting. Simply fold the linen in half and place it onto the plate along with your cutlery. (How cool do the napkins look on the black serving plates? They're the perfect addition to a moody winter table.)

autumn winter tablescape


Use a table runner.

Table runners are key to arranging a table, whether you use greenery, flowers or fabric they draw the eye to the centre of the table and create depth to an arrangement. I'm using the grey Kanso runner as the base for my table setting. 

christmas autumn tablescape


Don't forget the details.

Sometimes it's the simple touches that bring a table together. Glassware is an item easily overlooked, these delicate smokey rippled glasses and matching carafe are such a gorgeous detail and make this table way more interesting than it would look with plain glasses. 

winter table arrangement


Don't be afraid to think out of the box, for example, these Kanso tea towels come in coordinating patterns to the tableware and could be cut up into matching napkins! 

modern christmas winter table


Lastly add candles, cutlery and any final flourishes like name cards if it's a formal dinner!

modern christmas table decorations


I really love how this table settling turned out and hope you do too! You can find the Kanso collection available online but also in Sainsbury's stores right now. 

Back soon

Caroline x


22/11/2019

scandinavian natural christmas inspiration

with december sneaking up on us i thought i'd share some of the things that have been inspiring me lately on pinterest, yes, you guessed it, christmas decor!

i've found myself a little torn over our decorations this year, i'm a huge fan of natural decor with lots of greenery and earthy accents. however gabe is coming to an age where he's really starting to understand the excitement of christmas so i feel like i should have some more fun decorations for him. 

after talking to james and going back and forward on it we've decided to keep our holiday decor natural, it's just so beautiful and serene and fit's in with our home so well. (however we're going to decorate gabe's room with some fun banners and have a christmas tree full of kitsch colourful decorations for him.. it's all about the compromise right?) now we've made our mind up it's full steam ahead on branches of pine draped across doorways, minimal greenery wreaths and homemade garlands!

here's some of the gorgeous imagery i've been inspired by, i love the clean scandi vibe and handcrafted feel.
minimal christmas decorations
modern christmas decorating ideas

how are you guys going to be decorating this year?

back soon

caroline x


20/11/2019

minimal christmas decor scandinavian wreath

christmas fever has well and truly arrived here (in spirit.. i've not put my tree up quite yet aha!)
i'm beyond excited to celebrate christmas this year, gabe is nearly 2 and it's just the BEST age, i can't wait to wake up on christmas day and watch him enjoy the holiday festivities with our family. 

as always i'm itching to decorate already but i'm showing a little restraint. until dec 1st i'm officially holding off on putting up all my fave decorations, but i made some cute little wreaths that I thought i'd show you ahead of time so you can make them for yourself! 

how to make christmas wreaths

all you need is some wire and foraged pine branches or eucalyptus to make them. you can read the simple wire wreath tutorial i've written over at hunker now!

back soon

caroline x


30/10/2019

DIY leather effect trinket dish

Do you often find yourself discarding your favourite pieces of jewellery around the house? If your nightly ritual includes leaving your rings and necklaces on your bedside table this is the DIY for you! 

I'm guessing you've assumed that this trinket dish is made from some type of leather? Well look again folks, this catch-all dish has been made from clay. (Yes that's right, clay!!!) FIMO has created a leather-effect clay and it's pure GENIUS. Before I tried it I was a little sceptical, I figured it would be strange to work with and wouldn't really look like leather but I was sooooo wrong. 

I'm so excited to share this project with you, I'm rarely this excited about a product but this is something special.

DIY leather effect trinket dish
DIY catch all dish

The beauty of this clay is that once you've baked it becomes flexible. You can bend it, emboss it, cut it and even sew it. (Think of all the things you could make with leather-effect.. key rings, bookmarks, purses, jewellery. I have so many ideas for future projects already.)

I'm going to share the simple tutorial for this 'leather' trinket dish and you'll see why I'm so obsessed with this new discovery.


Materials:

Clay machine (or a rolling pin)
Knife
Ruler
Thread

Step 1. Pick your leather effect. I'm using the grey here but it comes in a wide range of colours (You can also combine different colours together to create new shades or cute effects like marble).

DIY trinket dish tutorial

Step 2. Roll out the clay, use a flat working surface like a tile, glass sheet or baking paper.

DIY trinket dish catch all

Step 3. Next, roll the clay out to a thickness of approximately 4mm. I've been using a clay machine and it's a total game-changer. 

fimo leather effect

I rolled my clay out waaaaay more times than I needed purely because I wanted to play with it. You just pop your clay in and turn the handle to roll out perfectly even clay.

....Obviously, you can use a rolling pin to roll the clay flat, it's just not as much fun!

DIY trinket dish catch all

Step 4. Once you've rolled the clay to a 4mm thickness you'll need to cut out a rectangle shape. (Use a sharp knife and push down when you cut leather effect to keep the edges sharp.) I cut my rectangle to measure 5-inches by 4-inches for my trinket dishes. Remove any excess clay. 


Step 5. Using your knife cut out a small square from each corner of your rectangle and leave to one side. 

clay leather effect

Step 6. Pierce holes in each corner of the remaining clay shape. 

fimo clay leather effect

 The trinket dish is now ready to bake.

DIY trinket dish

Step 7. Bake the clay at 130 degrees for no longer than 30 minutes. Allow to cool before handling the clay.


Step 8. Finish the trinket dishes by folding the sides up and tying some string through the corner holes to secure. 


I can't believe how similar this clay is to leather after baking, it's looks and feels like the real thing, it's so damn clever! 

diy leather effect catch all

... if you didn't know better you'd think this was a leather dish right? I'm keeping mine in the bedroom to stash my jewellery in. 

leather effect catch all
These dishes are also really handy for keeping keys and coins in too.

DIY trinket dish

What do you think? Let me know if you try using this clay too!

Back soon

Caroline x

Instagram

Caroline Burke | Burkatron. Theme by STS.